Leg Extension
 Execution
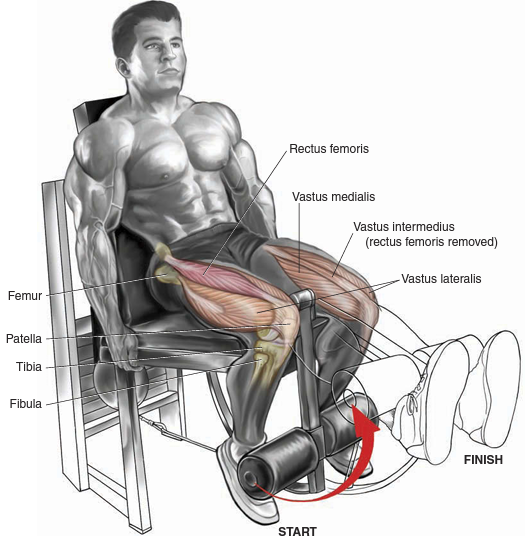
1. Sit on machine and place ankles under the roller pads.
2. Raise legs upward until knees are straight.
3. Lower legs back down to start position, knees bent 90 degrees.
Muscles InvolvedPrimary: Quadriceps.
Secondary: Tibialis anterior.FemurPatellaTibiaFibulaRectus femorisVastus medialisVastus intermedius (rectus femoris removed)Vastus lateralisSTARTFINISH
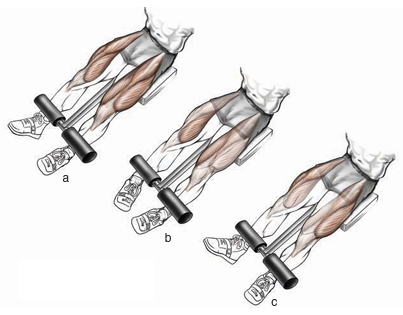
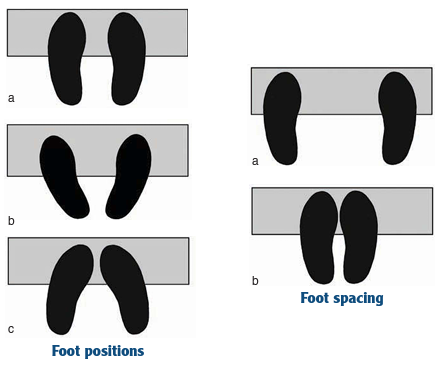
Anatomic FocusFoot position: Pointing your toes directly upward (a) hits all sections of the quadriceps equally. Pointing your toes inward (b) internally rotates the tibia to target the inner quad “teardrop” (vastus medialis). Pointing your toes outward (c) externally rotates the tibia to hit the outer quad (vastus lateralis).
 Foot spacing:
 There isn’t much space on the roller pads to adjust foot spacing, but placing your feet close together will tend to target the outer quad, and a wider spacing will focus a little more on the inner quad.
Body position: Adjust the backrest so that the back of your knee fi ts snugly against the front edge of the seat and your whole thigh is supported. Leaning your torso backward or raising your buttocks off the seat extends the hip joint stretching the rectus femoris, making this section of the quad work harder during the exercise.
Range of motion: The arc of motion should be approximately 90 degrees. Forcibly contract the quadriceps at the top when the knees are fully straight. To avoid excess stress on the patella (kneecap), do not bend the knees beyond 90 degrees.
Resistance: Resistance is fairly uniform, but on many new machines the resistance increases slightly as the weight is raised up. Less resistance at the start position minimizes stress across the kneecap with the knee bent.
VARIATIONOne-leg extension: Performing this exercise one leg at a time improves focus. The unilateral leg extension is particularly useful for improving thigh asymmetry or aiding in rehabilitation when one leg is injured.
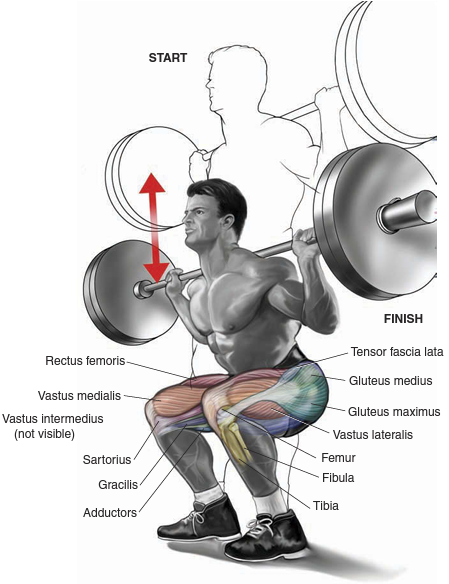
Barbell Squat
 Execution
1. Stand with a barbell across your shoulders, feet shoulder-width apart.
2. Slowly bend your knees until your thighs are parallel with the fl oor.
3. Straighten your legs to return to the start (upright) position.
Muscles InvolvedPrimary: Quadriceps, gluteals.
Secondary: Hamstrings, adductors, spinal erectors, abdominals.
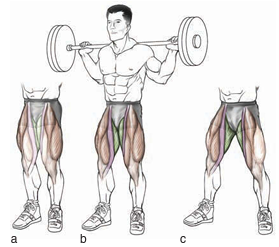
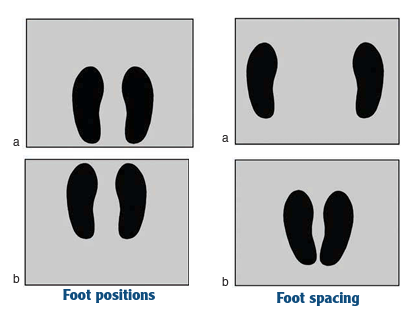
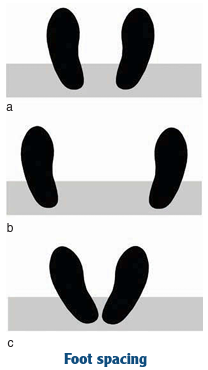
Anatomic FocusFoot spacing: A narrow stance (a) shifts focus to the outer quads (vastus lateralis) and abductors (tensor fascia latae). A shoulder-width stance (b) targets the whole thigh. A wider stance (c) places more emphasis on the inner quads, adductor muscles, and sartorius.
 Foot position:
 Your toes should point in the same direction as your thigh and knee: forward or slightly outward.
Positioning: Placing a 1-inch (2.5 cm) block under both heels shifts the weight forward, placing more emphasis on the quads and less on the gluteals. This adjustment is also useful for those with less fl exible ankles and hips.
Positioning the bar lower on the trapezius and shoulders improves balance while shifting focus to the gluteals; it is a technique used by powerlifters to lift more weight.
Body position: Keep your spine straight and head up at all times. Ensure your hands are placed equidistant from the center of the bar, and maintain a f i rm grip throughout the movement. Inhale deeply during the downward phase and exhale on the way up. Do not bend your torso forward, because this can cause back injury.
Range of motion: As the weight is lowered, stop when your knees bend to a 90-degree angle and your thighs are parallel to the fl oor. Squatting below parallel increases the risk of knee and spine injury.
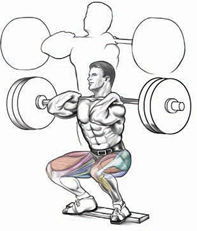
VARIATIONSFront squat: Performing the squat with the barbell held across the front of your shoulders shifts the emphasis to the quads, away from the gluteals. The front squat poses a higher degree of diffi culty and requires lighter weights.
 Machine squat:
 Performing this exercise using a machine, such as a Smith machine, helps balance and improves safety.
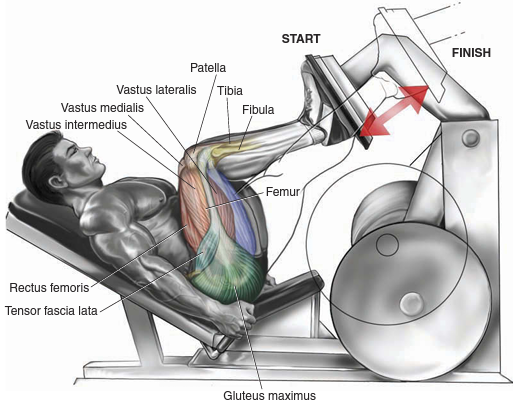
Leg Press
 Execution
1. Sit in the leg press machine and place your feet shoulder-width apart on the footplate.
2. Slowly lower the weight until your knees bend to 90 degrees.
3. Push the weight back to the beginning position by straightening your legs.
Muscles InvolvedPrimary: Quadriceps.
Secondary: Gluteals, hamstrings, adductors.
Anatomic FocusFoot position: Placing your feet low on the footplate (a) emphasizes the quadriceps. Positioning your feet higher on the footplate (b) switches the focus to the gluteals and hamstrings.
Foot spacing: Placing your feet shoulder-width apart targets the whole thigh. A wider foot spacing (a) places more emphasis on the inner quads (vastus medialis), adductor muscles, and sartorius. Placing your feet close together (b) shifts focus to the outer quads (vastus lateralis) and abductors (tensor fascia latae).
 Trajectory:
 Pushing the weight up using the balls of your feet and allowing your heels to rise off the footplate as the weight is lowered will target the quads and reduce load across your kneecap. Pushing the weight through the heels of your feet targets the hamstrings and gluteals.
Body position: The angle your torso makes with your legs infl uences muscular focus and the amount of stress through your lower back. When the angle between the seat and back rest is 90 degrees, emphasis is placed on the gluteals and hamstrings, but this acute angle places more stress on your lower back. If the backrest is tilted lower toward the fl oor, your torso leans back; this places less stress across your lower spine and places more emphasis on the quads. a b a b
Foot positionsFoot spacingRange of motion: Stopping a few degrees short of full lockout at the top keeps tension on the quads.
Resistance: In comparison with the barbell squat, the seated leg press reduces the axial load on your spine and reduces the risk of backache. Furthermore, the leg press emphasizes the quadriceps, not the gluteals.
VARIATIONOne-leg press: Performing this exercise one leg at a time is useful in focusing effort on a lagging thigh or protecting a leg when it is injured.
Hack Squat
 Execution
1. Place your back against the backrest and shoulders under the pads, and stand with your feet shoulder-width apart on the footplate, toes pointing forward.
2. Slowly lower the weight, bending your knees to 90 degrees.
3. Push the weight back to the beginning position by straightening your legs.
Muscles InvolvedPrimary: Quadriceps.
Secondary: Gluteals, hamstrings, adductors.
Anatomic FocusFoot spacing: Placing your feet shoulderwidth apart (a) targets the whole thigh. A wider foot spacing (b) places more emphasis on the inner quads, adductor muscles, and sartorius. Placing your feet close together (c) shifts focus to the outer quads (vastus lateralis) and abductors (tensor fascia latae).
 Foot position:
 Your toes should point in the same direction as your thigh and knee: forward or slightly outward. Placing your feet low on the footplate (close to your body) emphasizes the quadriceps, whereas placing your feet higher on the footplate requires more effort from the gluteals and hamstrings.
Trajectory: Pushing the weight using the forefoot and allowing your heels to rise off the footplate as the weight is lowered helps isolate the quads and reduces stress across the kneecaps. a b c
Body position: Keep your spine fl at against the backrest. Range of motion: Stopping a few degrees short of full lockout at the top keeps tension on the quads.
Resistance: In comparison with the barbell squat, the hack squat backrest provides support to your spine. Furthermore, the hack squat places more emphasis on the quadriceps and less on the gluteals.
VARIATIONSDumbbell squat: Squatting while holding dumbbells at arms’ length at your sides is a variation that combines elements of the barbell squat and the hack squat, but your grip is the weakest link.
Reverse hack squat: Performing the hack squat while facing the machine switches the focus to the gluteals and hamstrings.
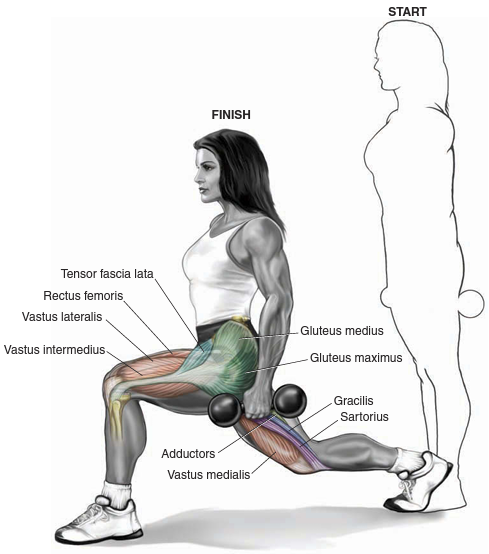
Lunge
 Execution
 1. Stand with feet shoulder-width apart while holding two dumbbells at arms’ length by your sides.
2. Step forward and bend the knee until your leading thigh is parallel with the f loor.
3. Return to the start position and repeat, using the opposite leg.
Muscles InvolvedPrimary: Quadriceps, gluteals.
Secondary: Hamstrings, adductors.
Anatomic FocusFoot spacing: A stable, shoulder-width stance works best to maintain balance.
Foot position: Point your toes straight ahead or slightly outward as you step forward. The back foot stays fi xed to the fl oor in the same spot.
Trajectory: Take a shorter step (lunge) to target the quadriceps. A larger step places the emphasis on the gluteals and hamstrings.
Body position: As you lunge forward, place your body weight on the leading leg. Keep your torso upright and your back straight.
Range of motion: During the lunge, your knee should bend 90 degrees, with your thigh parallel to the fl oor.
Resistance: The lunge requires a lighter weight than most other leg exercises. Using a weight that is too heavy may cause pain in the kneecaps.
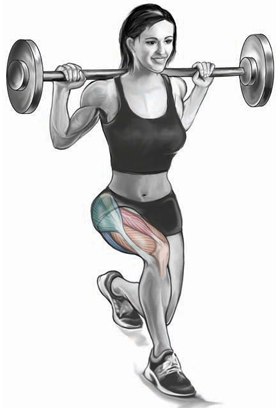
VARIATIONSBarbell Lunge Instead of holding two dumbbells at arms’ length by your sides, rest a barbell across your shoulders. Compared to barbell lunges, dumbbell lunges make it easier to maintain balance.
 Additional variations:Walking lunge:
 Instead of returning to the same start position, do a lunge walk. Perform lunges, one leg after another, so that you walk the length of the gym f l oor (or a parking lot or f i eld). Smith machine lunge: This is similar to the barbell lunge, but the machine provides stability and balance.
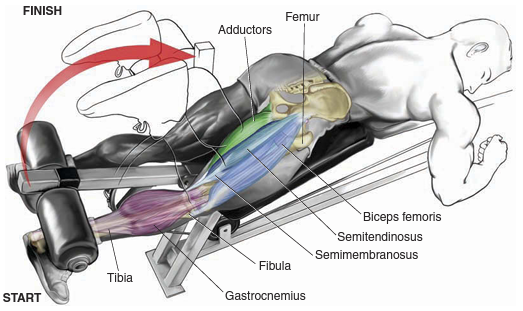
Lying Leg Curl
 Execution
1. Lie facedown on the machine and hook your heels under the roller pads.
2. Curl the weight by bending your knees, and raise your heels toward your buttocks.
3. Lower the weight back down to the start position.
Muscles InvolvedPrimary: Hamstrings.
Secondary: Gluteals, calf muscles.
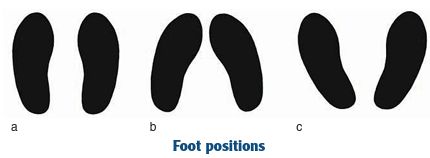
Anatomic FocusFoot position: Pointing your toes straight (a) targets all three hamstring muscles. Pointing the toes inward (b) emphasizes the inner hamstrings (semimembranosus and semitendinosus), whereas pointing the toes outward (c) focuses effort on the outer hamstrings (biceps femoris). Keeping your ankles bent at 90 degrees (dorsifl exed) minimizes contribution from the calf muscles and thereby helps isolate the hamstrings. Pointing your feet (tiptoe position) allows the calf muscles to participate in the exercise.
 Foot spacing:
 Placing your feet hip-width apart is the standard position. Wide foot spacing targets the inner hamstrings (semimembranosus and semitendinosus), whereas narrow foot spacing emphasizes effort of the outer hamstrings (biceps femoris). Foot spacing is limited by the size of the roller pad.
Body position: The padded surface of most machines is angled at hip level, bending your torso forward slightly. This body position tilts your pelvis and stretches the hamstrings, thereby helping isolate the muscles. Keep your spine straight, and do not raise your chest upward.
Range of motion: Bend your knees as far as possible during the upward phase. Stop a few degrees short of full extension at the bottom to keep tension on the hamstrings and minimize stress across the knee joint.
Resistance: Resistance is fairly uniform, but on many new machines the resistance is lower at the start position, where the hamstrings are fully stretched and most vulnerable to injury.
VARIATIONSeated leg curl: The upright backrest of the seated leg curl machine creates a 90-degree hip fl exion angle between your torso and thighs. While this body position affords a greater stretch, it prevents the hip extension that is required for a maximum contraction in the hamstrings.
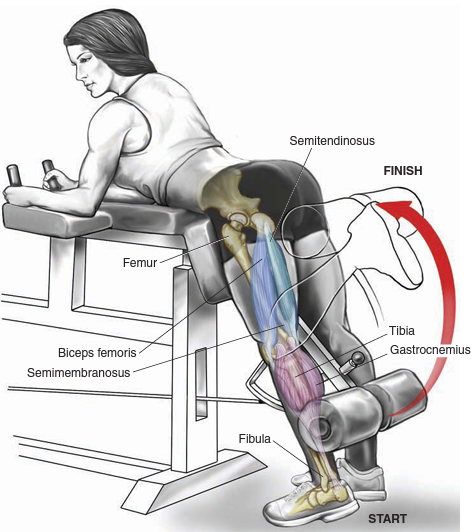
Standing Leg Curl
 Execution
1. Hook one heel under the roller pad, and support your weight with the other leg.
2. Curl the weight by bending your knee, raising your heel toward your buttock.
3. Lower the weight back down to the start position.
Muscles InvolvedPrimary: Hamstrings.
Secondary: Gluteals, calf muscles.
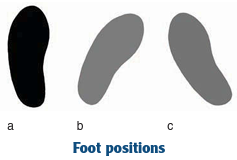
Anatomic FocusFoot position: Pointing your toes straight down (a) targets all three hamstring muscles. Pointing the toes inward (b) tends to emphasize the inner hamstrings (semimembranosus and semitendinosus), whereas pointing the toes outward (c) focuses effort on the outer hamstrings (biceps femoris). Keeping your ankles bent at 90 degrees (dorsifl exed) minimizes contribution from the calf muscles and thereby helps isolate the hamstrings.
 Body position:
 The padded surface of most machines is angled at hip level, bending your torso forward slightly. This body position tilts your pelvis and stretches the hamstrings, thereby helping to isolate the muscles. Depending on the machine design, your supporting leg may take a standing or kneeling position (see the Variation section).
Range of motion: Bend your knees as full as possible during the upward phase. Stop a few degrees short of full extension at the bottom to keep tension on the hamstrings and minimize stress across the knee joint.
Resistance: In contrast to the lying leg curl, the standing leg curl is performed one leg at a time, which helps muscle isolation and focus.Resistance is fairly uniform, but on many new machines the resistance is lower at the start position when the hamstrings are fully stretched and most vulnerable to injury.
VARIATIONKneeling leg curl: Using this machine, your nonworking leg is supported by kneeling on a pad, and your torso is supported on your elbows. Because your torso is bent forward at the waist, the hamstrings are stretched—an advantage over the exercise on the standing leg curl machine.
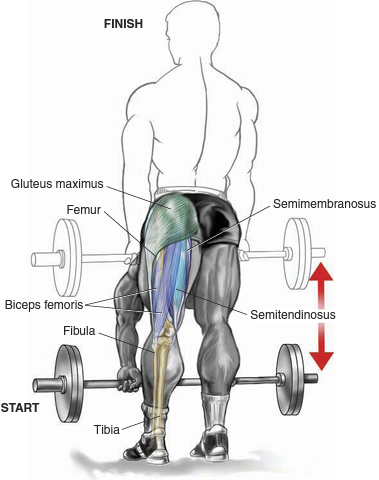
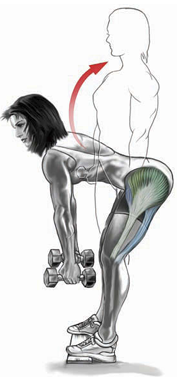
Stiff-Leg Deadlift
 Execution
1. Stand upright with feet directly below your hips, holding a barbell at arms’ length.
2. Bend forward at the waist, lowering the weight down but keeping your legs stiff.
3. Stop before the weight touches the fl oor, and raise it back up.
Muscles InvolvedPrimary: Hamstrings, gluteals.
Secondary: Spinal erectors, quadriceps.
Anatomic FocusFoot spacing: Position feet directly below the hips. A wide stance places more emphasis on the inner hamstrings.
Foot position: Point toes directly forward or slightly out.
Grip: Hands should be spaced shoulder-width apart so that the arms hang vertical and hands pass along the outer thighs. An over–under grip with one palm facing forward and the other facing back prevents the bar from rolling.
Trajectory: The bar should travel straight up and down, close to the body.
Body position: Knees may be slightly bent but should be kept stiff in order to isolate the hamstrings. Keep your back straight throughout the movement. Performing this exercise with the balls of both feet on a half-inch-thick (1.3 cm) weight plate is a safe way to prestretch the hamstrings.
Range of motion: Lower the weight until your hamstrings reach full stretch without rounding your spine. There is no need to perform this exercise while standing on a bench or block as a means of increasing the range of motion. When your pelvis achieves full forward tilt, the hamstrings are at full stretch. Bending your lower spine does not have any effect on the hamstrings or increase the range of downward motion. Rounding your lower spine merely increases the risk of injury. Depending on your fl exibility, the barbell should be lowered to a point below your knees or just above the ankles.
Resistance: The stiff-leg deadlift for hamstrings requires a lighter weight than that used during the traditional powerlift for strengthening the lower back (see here).
VARIATIONDumbbell Stiff-Leg DeadliftYou can also perform this exercise while holding a dumbbell in each hand at arms’ length.

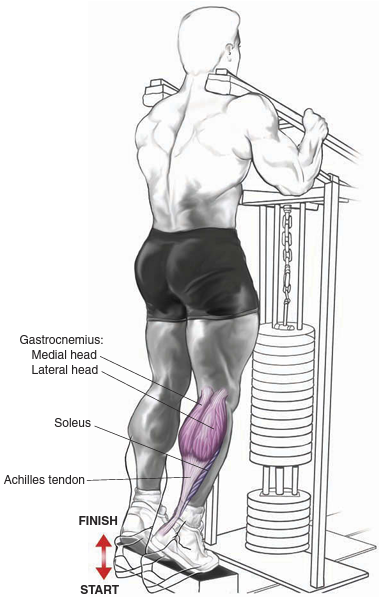
Standing Calf Raise
 Execution
1. Stand with your toes on the platform and shoulders under the pads, and lower your heels as far as possible for a full stretch.
2. Lift the weight by raising your heels as high as possible, keeping your legs straight.
3. Slowly lower your heels back down to the start position.
Muscles InvolvedPrimary: Gastrocnemius.
Secondary: Soleus.
Anatomic FocusFoot position: Pointing your toes straight ahead (a) targets the whole gastrocnemius muscle. Pointing your toes outward (b) emphasizes the inner (medial) head, whereas pointing your toes inward (c) targets the outer (lateral) head.
 Foot spacing:
 Positioning your feet hip-width apart targets the whole gastrocnemius muscle. A wide stance (a) tends to emphasize the inner (medial) head, whereas a narrow stance (b) targets the outer (lateral) head.
Body position: Keep your knees stiff and back straight. Keeping your knees locked straight stretches the gastrocnemius, which helps to focus effort on the gastrocnemius and minimizes soleus action. If your knees bend, the soleus is allowed to contribute to the movement.
Range of motion: To maximize the range of motion, aim for a full stretch at the bottom and full squeeze at the top. a b c a b
VARIATIONSSmith machine raise: You can perform this exercise at the Smith machine while standing on a thick block of wood.
One-leg calf raise: Perform calf raises one leg at a time, holding a dumbbell in your hand on the same side.
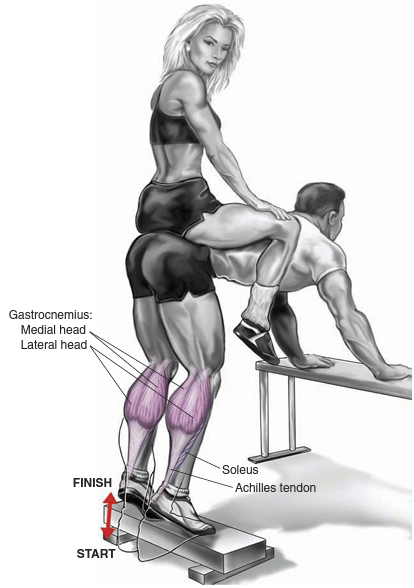
Donkey Calf Raise
 Execution
1. Place your toes on a block, lean forward while supporting your torso on the bench, and lower your heels as far as possible.
2. Lift the weight by raising your heels up as high as you can, keeping your legs straight.
3. Slowly lower your heels down to the start position.
Muscles InvolvedPrimary: Gastrocnemius.
Secondary: Soleus. Anatomic
Focus Foot position: Pointing your toes straight ahead (a) targets the whole gastrocnemius muscle. Pointing your toes out (b) emphasizes the inner (medial) head, whereas pointing your toes inward (c) targets the outer (lateral) head.
Foot spacing: Positioning your feet hip-width apart targets the whole gastrocnemius muscle. A wide stance emphasizes the inner (medial) head, whereas a narrow stance targets the outer (lateral) head.
Body position: Keep your spine straight and torso parallel to the fl oor. Keeping your knees fully straight helps isolate the